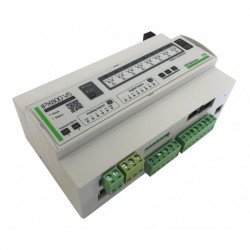
Your gateway to building your own Z-Wave gateway.

Security guarantees

Shipping Policy


Next generation smart home doesn’t have to be expensive – with a few key devices you can connect and automate electronics. Step by step. Room by room. At your own pace, in your own time, and within your own budget.
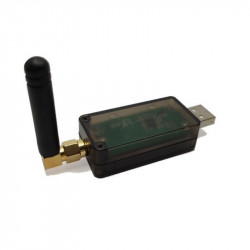
Usually the most expensive part of any smart home is its gateway – that's the software-powered hub that binds all your connected devices together in order to control and automate them. With Aeotec’s Z-Stick Gen5+ your gateway no longer needs to be expensive. Nor does it need to be a security or privacy risk. Z-Stick Gen5+ lets you build your own, locally hosted gateway. A gateway that is cloud free and that offers the features and security that are just right for you and your individual vision.
Z-Stick Gen5+ has long been the Z-Wave community's USB tool for building a gateway hub. It's a best-seller because of its compatibility, its quality, and its functionalities. This new plus-model brings a whole new array of compatibility and functionality to a USB stick already powering over 100,000 smart homes.
New Pi from Raspberry, new Z-Stick from Aeotec. As it was built upon an older Z-Wave stack, the non-plus model of Z-Stick Gen5 isn't compatible with Raspberry 4. But Z-Stick Gen5+ is. That opens up your home automation software to Raspberry's new architecture, including 8GB of RAM and an ARM v8 1.5GHz CPU.
New systems, new challenges. The increase in popularity of automation systems means that they now face greater security challenges as more people try to exploit weaknesses in archaic technology. Z-Stick Gen5+ future-proofs against such weaknesses by offering Z-Wave S2 security natively, UL 1023 compliance, and ECDH key exchange natively.
Simpler device setup has finally come to Z-Wave with SmartStart. This new QR code based method allows you to pair a Z-Wave device with your automation system simply by scanning its QR code. Even when not fully installed, you'll be able to connect devices through Z-Stick Gen5+ to your Z-Wave software, provided that software offers QR-based pairing.
FEATURES :
TECHNICAL SPECIFICATIONS :
Data sheet


Jean-Claude L. published the 21/02/2023 following an order made on 06/02/2023
Utilisé avec Jeedom en sauvegarde de mon réseau zwave. C'est parfait.
André G. published the 31/01/2023 following an order made on 23/01/2023
Ce contrôleur à l'air parfait, mais je n'ai pas suffisamment de retour d'expérience pour le juger.
Anonymous customer published the 24/07/2022 following an order made on 18/07/2022
Pas encore testé
Brun L. published the 11/03/2022 following an order made on 03/03/2022
Fonctionnel
D'Heucqueville G. published the 31/01/2022 following an order made on 19/01/2022
installation sans problème
Parfois, le processus d'inclusion échoue et il existe quelques étapes de dépannage que vous pouvez prendre pour assurer le maximum de succès pendant le processus d'inclusion.
Assurez-vous que Z-Stick Gen5 et le périphérique Z-Wave que vous essayez d'inclure fonctionne sur la même fréquence:
ZW090-A est la fréquence des États-Unis
ZW090-B est une fréquence Australienne
ZW090-C est la fréquence de l'Europe
Si les étapes ci-dessous ne fonctionnent pas, c'est qu'il y a des problèmes avec le périphérique que vous essayez d'inclure ou la méthode d'inclusion.
Tout d'abord, faites une exclusion de votre périphérique Z-Wave (cela permet également de réinitialiser les produits)
Cela garantit que toutes les informations du réseau dans le périphérique Z-Wave sont complètement effacées, cela doit être effectué après chaque processus d'inclusion échoué ou avant d'ajouter un nouvel appareil.
1) Maintenez le bouton du Z-Stick Gen5 enfoncée jusqu'à ce qu'il clignote rapidement
2) Appuyez sur le bouton du périphérique Z-Wave que vous souhaitez réinitialiser d'usine
La LED du Z-Stick Gen5 confirmera la réinitialisation d'usine de votre périphérique Z-Wave en devenant bleu.
3) Appuyez maintenant sur le bouton du Z-Stick Gen5 pour le sortir du mode d'exclusion
Maintenant fapites l'inclusion de l'appareil dans votre réseau
Vous vous êtes assuré que le périphérique Z-Wave que vous souhaitez inclure est entièrement réinitialisé, essayez d'associer l'appareil à votre réseau.
4) Appuyez sur le bouton Z-Stick Gen5, la LED devrait maintenant clignoter en bleu
5) Appuyez sur le bouton du périphérique Z-Wave que vous souhaitez ajouter.
La LED du Z-Stick Gen5 devrait clignoter rapidement, puis devenir de couleur bleue si c'est réussi, ou rouge si ça a échoué.
Si ca n'a pas fonctionné, revenez à l'étape 1.
Sinon, vous avez appairé avec succès votre périphérique Z-Wave à votre réseau Z-Stick Gen5.
Le logiciel de sauvegarde et restauration du Z-Stick Gen5 permet de réaliser une sauvegarde de votre réseau Z-Wave et de la restaurer en cas de problème avec le contrôleur.
Pour lancer le logiciel, décompresser le fichier .rar, et exécuter le fichier zwave_500.exe
Notes :
Il y a deux méthodes pour réinitialiser le Z-Stick Gen5. La première se réalise à partir d’un logiciel supportant cette fonctionnalité, comme le Zensys Tool. La seconde est manuelle, en appuyant sur le bouton situé derrière le Z-Stick Gen5.

Si vous cherchez un logiciel Z-Wave pour votre ordinateur sous Windows, OSX ou Linux, alors vous pouvez choisir parmi un certain nombre qui sont gratuits ou nécessitent l'achat d'une licence pour continuer à les utiliser.
Les logiciels ci-dessous peuvent être utilisés avec les versions Z-Stick Lite, S2, ou GEN5.
Logiciel avec période d'essai ou limitation d'utilisation1. Homeseer (1 mois d'essai)Vous trouverez le driver pour le dongle Z-Wave+ Z-Stick Gen5 (ZW090-C) en téléchargement ci-dessous.
Vous aurez besoin uniquement de ce driver pour une utilisation avec un ordinateur fonctionnant sous Windows.
Méthode 1 (uniquement valable pour Windows 8 ou 10) :
Faîtes un clic droit sur le fichier .INF, et sur le menu qui s'affiche cliquez sur INSTALLER.
Méthode 2 (utilisable avec tous les OS) :
Il y a une autre façon pour installer le fichier .INF. Veuillez suivre les étapes ci-dessous.
1) Ouvrez le "Gestionnaire de périphériques".
2) Regardez "Ports (COM & LPT)". Normalement le Z-Stick doit apparaitre ici si le driver a été installé correctement.
Ou dans "Autres appareils".

3) Le Z-Stick Gen5 doit apparaitre comme un "Appareil Inconnu".
4) Faîtes un clic droit sur "Appareil Inconnu" puis cliquez sur "Mettre à jour le pilote".
5) Sur la nouvelle fenêtre, cliquez sur "Rechercher le pilote sur mon ordinateur"
6) Recherchez le fichier .INF
7) Si il est installé correctement, il devrait apparaître comme l'image ci-dessous comme un appareil UZB, en dessous de "Ports (COM & LPT)". Le numéro de port COM peut changer en fonction du port USB utilisé.

Ce fonctionnement est tout a fait normal lorsque vous connectez le Z-Stick sur le port USB d'un ordinateur.
Cela signifie qu'il est correctement reconnu.
Your gateway to building your own Z-Wave gateway.